A few users would like to know if iTunes is present for Chromebook or not and also want to understand the installation process for iTunes on Chromebook.
Install iTunes on Chromebook
If you have a Chromebook, there is nothing to worry about! Apple has launched a different version of iTunes for Chromebook as well. You can find the app on the Microsoft Store or visit the official Apple website to find the link to download iTunes for your Chromebook.
How to run iTunes on Chromebook?
Here is a step-by-step process to install and run iTunes on Chromebook:
Step 1: Enable Linux on your Chromebook
Chromebook, by default, cannot run iTunes on the system. Hence, you need to enable Linux on your Chromebook first and then try to run the iTunes app.
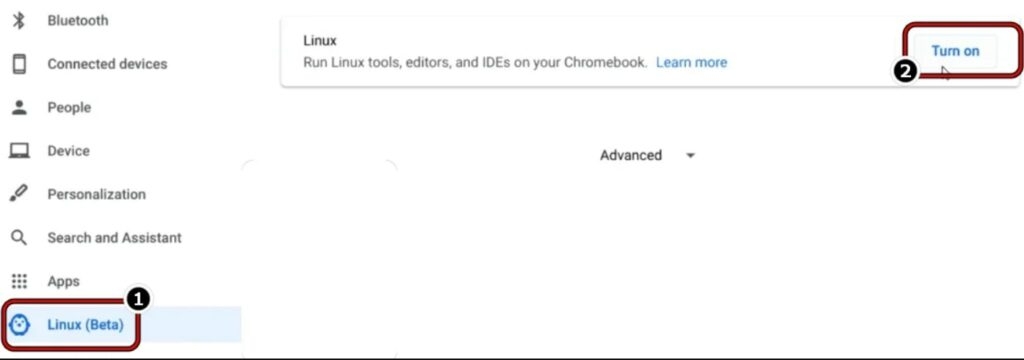
Firstly, navigate to the bottom right corner of your Chromebook and click on the ‘Settings’ icon.Once you click on the ‘Settings’ section, you can find Linux (Beta) option on the left side panel. Click on it.
You can find the ‘Turn on’ option on the right side of the Linux option. Click on it.Once the Linux setup is finished, you can see the Linux application from your menu bar. Click on it and run the following command on the Linux Terminal:
sudo apt-get update && sudo apt-get upgrade -y
Step 2: Install the Wine Application on your Chromebook
Once the above command gets executed, run the following command on the Linux terminal:
After the above command gets executed, run the below commands one by one to enable the Wine support for 32-bit applications.
Step 3: Download iTunes for Chromebook
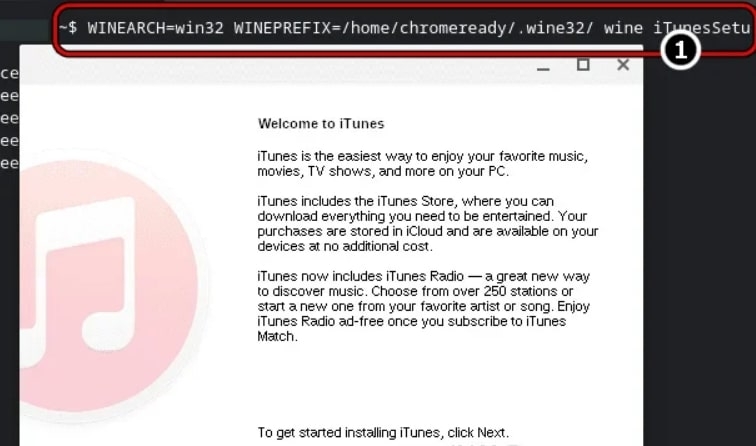
Now, navigate to Apple’s official website and download the 32-bit iTunes application for Windows (Chromebook does not support the 64-bit application version). Once you see the download prompt, select the location to save the setup file of the iTunes application. After the application is downloaded to the system, move the file to the Linux directory and name the application as itunes.exe.
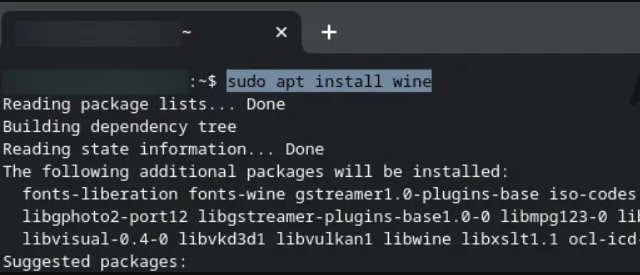
Step 4: Install the 32-Bit Version of Wine
Open the Linux Terminal and execute the following command to install the Wine 32-bit version.
Now, you will see the iTunes installation window pop-up. Click on the ‘Next’ button.
Now, follow the prompts on the screen until you see the iTunes installation is completed.You can now launch the iTunes application and use it.
Create Shortcut for iTunes on Chromebook
Most users like to have a shortcut for the application on their desktop or anywhere that is easy to access. Here is how you can create a shortcut for iTunes on Chromebook:
Firstly, launch the ‘File Manager’ on Chromebook and navigate to the ‘Linux Files’ section.Now, click on the three vertical dots present in the top-right corner and select the ‘Show Hidden Files’ option.Now, go to the path: .local » share » applications » wine » Program Files » iTunesHere, select iTunes.desktop file, select the option ‘Open With,’ and click on ‘Open with Text.’After “Exec=” enter your username in place of
After completing the above steps, you can launch iTunes from the application drawer.
Use the Virtual Machine to Run Chromebook
Suppose you are unable to use the iTunes application on your Chromebook, even after following the above steps. In that case, you can use a virtual machine on your Chromebook and use iTunes on that virtual machine. You can either use a VMWare machine or Virtual Box to run iTunes on Chromebook.
Conclusion
We hope this article has helped you understand the process of installing iTunes on Chromebook. Though the steps involved in the installation are not so easy, however, once set up, the working of iTunes on your Chromebook will be a breeze.
10 Best Browsers for ChromebookBest Free & Public DNS ServersBest Chromebook Under 300 USD